Showing posts with label Photography. Show all posts

Picking A Digital Camera

0 comments
a JugarImage by Roberto Carlos Pecino via

Handpicking the right digital camera can be a daunting task. Picking the right camera can depend on the type of pictures to be taken and the size of the prints. Most people do not need the most sophisticated and most expensive camera on the market today. The typical user may not even print their pictures, but instead email them or download them to Facebook, Flickr, Picasa, or another online site for friends and family to access them. In most cases the brand name can be a matter of preference. Cameras have 'so many' different features, but there are two which are the most important to consider when picking a new one.

The first, is the Megapixel rating of the camera. The number of pixels that a camera saves for an image determines the available size of the captured image. The more pixels the camera captures the larger an image can be printed, and the better the image quality for prints and on the computer screen. All else considered, the megapixel rating of the camera is the most important option.

The second most important option, is the optical zoom of the camera lens. Most digital cameras offer a certain amount of zoom using the optics of the lens, and a digital zoom. Optical zoom wins out over digital zoom every time. The amount of digital zoom the camera is capable of, is not important. A 3X optical zoom is the minimum serviceable for the typical user that generally takes 'people pictures'. If you wish to take photos of objects further away, you might want a higher optical zoom capability.

Choose which other options are most important to you. There may be options in lcd screen size, or low light capabilities in similar makes and models of camera. Take these into account in addition to the options mentioned above.

The Bottom Line;
1. The most important feature to look for in a digital camera is the megapixel rating. The higher the rating, the better your pictures will be.

2. The optical zoom is the second most important feature in which to base camera selection. As with megapixel rating, the higher the better.


Get Updates By RSS


Reblog this post [with Zemanta]

3 Keys To Printing Perfect Black and White Photographs

0 comments

How many of us know our way around a darkroom, or even use one? Not me, the last time I was in the darkroom, was the day before I used Adobe Photoshop for the first time. Adobe Photoshop is arguably THE essential graphics tool for both Windows and Macintosh users. There are 3 primary steps to getting the best possible print out of your black and white photographs.

1. Correct the Final Resolution - Make sure your picture is at the proper final resolution for printing it at the desired size. It doesn't matter if you are using a high-end laser or inkjet printer (a plotter falls into the latter category), or a personal printer with less resolution. It must have a final resolution of 160 dpi for black and white images. Remember that if your picture is saved as a 3 inch by 5 inch image at 160 dpi (480 pixels x 1012pixels), it will only be 80 dpi when enlarged to 6x10 inches.

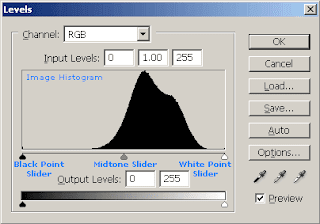
2. Change the levels - Levels are a powerful tool in Photoshop. Levels determine the brightness and contrast of the image. It is easier to use this tool instead of the "Brightness and Contrast" tool because of the histogram that is given. You access the "Levels" tool by going to Image>Adjustments>Levels. You will then see a histogram (visual graph) of the black, white and gray areas of your image. The black is (0) and the white is (255), while the mid-tones, or gray level is usually (128) when you start (the blue text below is shown for reference only).


On the far left is the slider for blacks, the far right is for whites and the middle slider is for midtones or grays. There should always be some true black and some true white in every black and white image. Yes, each individually printed dot is black, but the dot patterns determine the gray values.
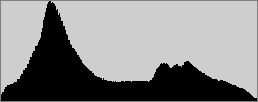
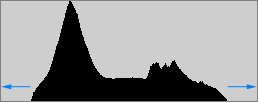
Make sure the preview box is checked and pull the black slider to the right until it reaches the start of the bar graph (the area of the graph with bars projecting up). Looking at the picture while moving the slider, will allow you to see how the image is changed. The "Before" is on the left and the "After" is on the Right.


Do the same with the far right slider. Moving the the middle slider either right or left to stretch the amount of shadowing or compress the amount of brightness. Clicking "OK" will apply your changes. Don't worry, you can always undo a change if you are not satisfied. You can also make these changes, using the droppers, by clicking them on the areas to be black, white or gray.

3. Unsharp Mask - No image whether it looks it or not, is perfect. Most need to be sharpened. This tool works by using a slightly blurred version of the original, behind the original image, to adjust the light and dark edges of the image which will emphasize details and textures.

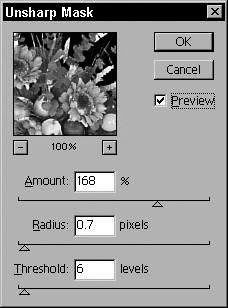
Get the "Unsharp Mask" tool by going to the pull-down menu for Filters> Sharpen>Unsharp Mask, which will bring up a window for adjusting the image. Again, make sure the preview box is checked, and either, enter a number in the box or move the "Amount" slider to the right until the image looks best to you. This is the overall quantity of effect.

The "Radius" value determines how many pixels around the area to be sharpened will be included.

The "Threshold" value is for Clipping the level of color change accepted by the program during sharpening. A zero (0)value sharpens all pixels in the image, and as the number increases, the amount of contrast between pixels increases as they are considered for sharpening by the program.

The "Radius and "Threshold settings are very sensitive and take time to master. They are usually not needed unless the resolution of the original image is quite high (more than 1500 ppi).

Of course I am over simplifying the use of these tools. There are a lot of intricate calculations these tools make and change in your images. No matter how proficient you may become with Photoshop, these three tools will be the base that you will start with. You do not have to know the exact reason and settings for each of these in order to make use of them. If you have any questions about using other tools in Photoshop, send me an email with the question. I will gladly provide you with an answer.
 

Plain Answers to Geek Questions Copyright © 2009 by Andy Honaker; Adapted from Ipiet's Blogger Template