Showing posts with label Software. Show all posts

Fix Your PC Problems For Free

0 comments
 There is a new service (currently in beta) from Microsoft providing diagnoses and fixes for common PC and connected devices. The free Fix It Center offers a set of online and offline tools for helping you fix your computer.

Consolidated into a single solution is a variety of support resources that have been scattered throughout Microsoft's web site and even in Windows itself. Windows version XP through Windows 7 are supported. Fix It Center will not only solve known problems, but scans your PC for potential problems and suggests fixes for them.

Fix It Center requires very little technical input. Just choose the category of the problem and it will launch the correct diagnosis program. The correction to some problems are automatic. Remember that this program is still under development and is for common problems. It may not work for the white elephant problems out there.

Here's how it works.
    • Run the downloaded program and accept the licensing agreement. This will then start the download and installations of the full Fix It Center program. 
      •  The program will install several solutions based on the configuration or your PC. To take advantage of the full program you will need to setup an online account with Microsoft. This will give you not only the Fix It Center troubleshooter solutions and access to the Microsoft knowledge base. Clicking the Fix It Center icon on your desktop will launch the program and step you through the category choices, diagnosis and correction.

      Get Updates By RSS


      Reblog this post [with Zemanta]

      Save Yourself, Update Your Adobe Acrobat Software!

      0 comments
      Adobe Reader 9 Icon
      Adobe addressed a list of 29 security-related flaws in Acrobat 9 and Adobe Reader 9 this week.

      Adobe calls the new 9.2 updater fixes critical for security issues that  for both Mac and Windows users.

According to an Adobe security bulletin, "These vulnerabilities could cause the application to crash and could potentially allow an attacker to take control of the affected system.

      "

The security issues also affect older versions of Acrobat and Adobe Reader. Since some users aren't able to upgrade to Acrobat 9 or Adobe Reader 9, the company released Acrobat 8.1.7 and 7.1.4 along with Adobe Reader 8.1.7 and 7.1.4.

The updates are available for download at the Adobe Support Web site.

      The Adobe support site is "a little bit" confusing to navigate and determine the right update for your computer and operating system, But... the easiest way to upgrade your copy of Acrobat or Acrobat Reader is to launch the program, Click on the "Help" pull down, and choose "Check for Updates".

      Subscribe to RSS Feed


      Reblog this post [with Zemanta]

      Creating an HTML email

      0 comments

      "Hey Andy, I am wondering if you can advise me on something. I am trying to design a graphic email blast where the graphic appears in the body of the email, and different images within the graphic, when clicked on, open up a new window and take the user to a web link.

      I have CS3 on my mac, and I am wanting to create the graphic using InDesign and/or Photoshop, and then add images in InDesign.

      I have Dreamweaver but have never used it; is that what I would need to use to create/activate hyperlinks within this graphic? Should I embed everything in InDesign and then export as a pdf first?
      This may not make any sense, and I admittedly am not real sure what I’m doing, but if you could provide me with some guidance or basic fundamentals I’d reallllly appreciate it!

      Thanks! PJ"

      Hey PJ,

      The quickest and easiest way, requires no web design experience at all. There are much more complicated ways using Adobe DreamWeaver, but you don't want to add that learning curve to your project. I can go into that later if someone really wants to know.

      Go ahead and use Adobe Photoshop to create your images, but use Microsoft Word to do the layout and to create the HTML. You can start with either a word document or html page.

      1. Create tables to help you put images in place. use border lines to match up layout, and change to no borders when layout is complete.

      2. Link each image to an image that is on a dedicated server. Your VT web space will do. Make sure url is relative, example - http://www.servername.com/images/image01.jpg

      3. Use text as needed to complete layout completely.

      4. If you need a background image behind everything, use a stationary template.

      5. When layout is complete "Save as" HTML document.

      6. insert into email,

      7. Make any corrections necessary and send to self for testing layout and hyperlinks, before mass mailing.

      Let me know if I can provide additional help and good luck!

      3 Keys To Printing Perfect Black and White Photographs

      0 comments

      How many of us know our way around a darkroom, or even use one? Not me, the last time I was in the darkroom, was the day before I used Adobe Photoshop for the first time. Adobe Photoshop is arguably THE essential graphics tool for both Windows and Macintosh users. There are 3 primary steps to getting the best possible print out of your black and white photographs.

      1. Correct the Final Resolution - Make sure your picture is at the proper final resolution for printing it at the desired size. It doesn't matter if you are using a high-end laser or inkjet printer (a plotter falls into the latter category), or a personal printer with less resolution. It must have a final resolution of 160 dpi for black and white images. Remember that if your picture is saved as a 3 inch by 5 inch image at 160 dpi (480 pixels x 1012pixels), it will only be 80 dpi when enlarged to 6x10 inches.

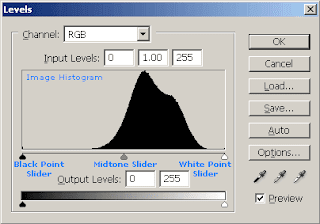
      2. Change the levels - Levels are a powerful tool in Photoshop. Levels determine the brightness and contrast of the image. It is easier to use this tool instead of the "Brightness and Contrast" tool because of the histogram that is given. You access the "Levels" tool by going to Image>Adjustments>Levels. You will then see a histogram (visual graph) of the black, white and gray areas of your image. The black is (0) and the white is (255), while the mid-tones, or gray level is usually (128) when you start (the blue text below is shown for reference only).


      On the far left is the slider for blacks, the far right is for whites and the middle slider is for midtones or grays. There should always be some true black and some true white in every black and white image. Yes, each individually printed dot is black, but the dot patterns determine the gray values.
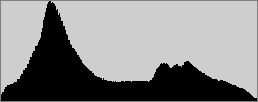
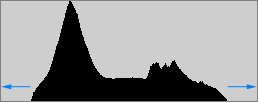
      Make sure the preview box is checked and pull the black slider to the right until it reaches the start of the bar graph (the area of the graph with bars projecting up). Looking at the picture while moving the slider, will allow you to see how the image is changed. The "Before" is on the left and the "After" is on the Right.


      Do the same with the far right slider. Moving the the middle slider either right or left to stretch the amount of shadowing or compress the amount of brightness. Clicking "OK" will apply your changes. Don't worry, you can always undo a change if you are not satisfied. You can also make these changes, using the droppers, by clicking them on the areas to be black, white or gray.

      3. Unsharp Mask - No image whether it looks it or not, is perfect. Most need to be sharpened. This tool works by using a slightly blurred version of the original, behind the original image, to adjust the light and dark edges of the image which will emphasize details and textures.

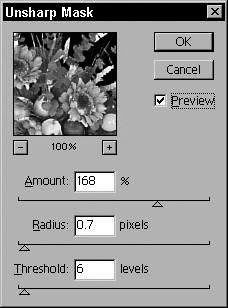
      Get the "Unsharp Mask" tool by going to the pull-down menu for Filters> Sharpen>Unsharp Mask, which will bring up a window for adjusting the image. Again, make sure the preview box is checked, and either, enter a number in the box or move the "Amount" slider to the right until the image looks best to you. This is the overall quantity of effect.

      The "Radius" value determines how many pixels around the area to be sharpened will be included.

      The "Threshold" value is for Clipping the level of color change accepted by the program during sharpening. A zero (0)value sharpens all pixels in the image, and as the number increases, the amount of contrast between pixels increases as they are considered for sharpening by the program.

      The "Radius and "Threshold settings are very sensitive and take time to master. They are usually not needed unless the resolution of the original image is quite high (more than 1500 ppi).

      Of course I am over simplifying the use of these tools. There are a lot of intricate calculations these tools make and change in your images. No matter how proficient you may become with Photoshop, these three tools will be the base that you will start with. You do not have to know the exact reason and settings for each of these in order to make use of them. If you have any questions about using other tools in Photoshop, send me an email with the question. I will gladly provide you with an answer.
       

      Plain Answers to Geek Questions Copyright © 2009 by Andy Honaker; Adapted from Ipiet's Blogger Template